
If you’re experiencing issues with your camera flash not working, you’re not alone. This is a common problem that can happen to anyone, whether you’re using a smartphone, a digital camera, or an external flash. The good news is that there are several possible solutions to this problem, depending on the cause.
Common Issues with Camera Flash
Off Flash
One of the most common issues with camera flash is that it may be turned off. Sometimes, users forget to turn on the flash or accidentally turn it off.
Flash Damage
Flash damage can occur due to various reasons, such as dropping the camera or exposing the flash to water or extreme temperatures. If you suspect that your flash is damaged, take your camera to a professional for repair. Do not attempt to fix the flash yourself as it can be dangerous and may cause further damage to your camera.
Overheating Flash
Flash overheating can occur when the flash is used continuously for an extended period. This can cause the flash to stop working temporarily until it cools down. To avoid flash overheating, take breaks between shots, or use an external flash that can handle longer periods of use.
Flash Bugs
Flash bugs can occur due to software issues or firmware updates. If you notice that your flash is not working after a software update, check for any firmware updates that may fix the issue. If the problem persists, contact the camera manufacturer for further assistance.
Camera Flash on iPhone
The camera flash on an iPhone can be a helpful tool for taking photos in low light conditions. However, sometimes the flash may not work as expected. In this section, we will cover how to activate the flash on an iPhone and troubleshoot any issues that may arise.
Activating Flash on iPhone
Activating the flash on an iPhone is a straightforward process. To do so, follow these steps:
- Open the Camera app on your iPhone.
- Swipe up or tap the arrow button located at the top of the screen.
- Tap the flash icon located in the top left corner of the screen.
- Choose the desired flash setting: On, Off, or Auto.

Once you have selected the desired flash setting, you are ready to take a photo with the flash.
Troubleshooting iPhone Camera Flash
If the camera flash on your iPhone is not working properly, there are a few troubleshooting steps you can take:
- Remove any case, accessory, or film that might block the camera or flash or that places a magnet near the camera.
- Test the camera by trying to take a photo.
- If the flash only works occasionally, open the Camera app and tap the flash button to choose a different setting.
- If the camera flash still does not work, you may need to contact Apple Support for further assistance.
It is also important to keep your iPhone up to date with the latest software updates. These updates can include bug fixes and improvements to the camera and flash functionality.
Camera Flash on iPad
If you’re having trouble with the camera flash on your iPad, don’t worry, you’re not alone. Here are some tips to help you activate and troubleshoot the camera flash on your iPad.
Activating Flash on iPad
To activate the camera flash on your iPad, open the Camera app and select the flash icon. You can choose from three different flash settings: On, Off, and Auto.
If your iPad has a front-facing camera, you can also use the screen as a flash for selfies. To enable this feature, tap the lightning bolt icon in the top left corner of the Camera app and then tap the camera icon with the arrows pointing towards the front of the iPad.
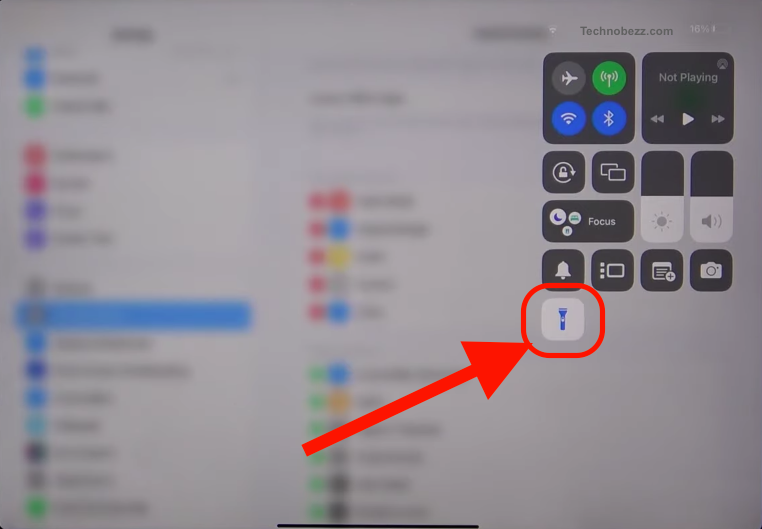
You can also access the camera flash from the Control Center. Swipe down from the top right corner of the screen to open the Control Center and then tap the flashlight icon. This will turn on the flashlight, which can be used as a makeshift camera flash in low-light situations.
Troubleshooting iPad Camera Flash
If your camera flash is not working properly, there are a few things you can try to troubleshoot the issue.
First, make sure that the camera lens and flash are clean and free of any debris or smudges. This can cause the flash to not work properly.
If the camera flash still isn’t working, try restarting your iPad. This can help clear out any temporary software issues that may be causing the camera problem.
If the issue persists, you may need to reset your iPad’s settings. Go to Settings > General > Transfer or Reset iPhone > Reset > Reset All Settings. This will reset your iPad’s settings to their default values, but will not delete any of your data.
![]()
If none of these solutions work, you may need to contact Apple Support for further assistance.
Remember, the camera flash on your iPad is an important feature that can help you capture better photos and videos in low-light situations. By following these tips, you can activate and troubleshoot the camera flash on your iPad with confidence.
Maintenance of Camera Flash
Regular maintenance of your camera flash can help ensure that it works properly and lasts longer. Here are some simple steps you can take to maintain your camera flash:
Cleaning the Flash
One of the most important things you can do to maintain your camera flash is to keep it clean. Dirt and grime can accumulate on the flash over time, which can cause it to malfunction. To clean your camera flash, follow these steps:
- Turn off your camera and remove the battery to prevent any damage.
- Use a microfiber cloth to gently wipe the flash and remove any dirt or dust.
- Use a can of compressed air to blow out any remaining debris.
- Reinsert the battery and turn on your camera to test the flash.
Checking for Physical Damage
Physical damage can also cause your camera flash to stop working. Here are some signs of physical damage to look out for:
- Cracks or dents on the flash unit
- Loose or missing parts
- Signs of water damage
If you notice any of these signs of physical damage, it’s best to take your camera to a professional for repair. Attempting to fix a damaged flash on your own can cause further damage to your camera.
Regular maintenance of your camera flash can help ensure that it works properly when you need it. By cleaning your flash and checking for physical damage, you can help prolong the life of your camera and avoid costly repairs.
Software Solutions
If your camera flash is not working, there are some software solutions that you can try before taking your camera to a repair shop. In this section, we will discuss two possible solutions: software update and resetting settings.
Software Update
One of the first things you should try if your camera flash is not working is to check if there is a software update available for your camera. A software update can fix bugs and issues that may be causing your camera flash to malfunction.
To check for a software update, you can go to your camera’s manufacturer website and look for the latest firmware version available. You can also check if your camera has a Wi-Fi connection and see if there is an update available through the camera’s app.
Reset Settings
If a software update does not solve the problem, another solution you can try is resetting your camera settings. This can help fix any settings that may be causing your camera flash to malfunction.
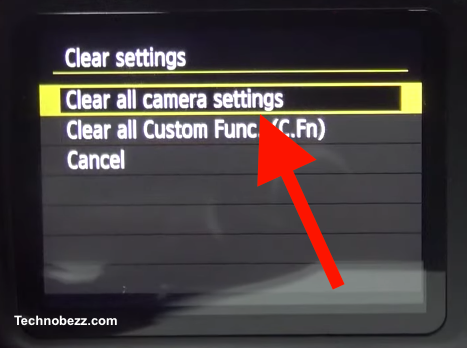
To reset your camera settings, you can go to your camera’s menu and look for the “Reset” or “Clear Settings”option. This will reset all your camera settings to their default values. Keep in mind that this will also erase any custom settings you may have set up, so be sure to back up any important settings before resetting.
In conclusion, if your camera flash is not working, there are some software solutions you can try before taking your camera to a repair shop. Checking for a software update and resetting your camera settings are two possible solutions that can help fix the issue.
Using In-Camera Flash
In-camera flash is a built-in feature in most cameras that provides additional light when taking pictures in low light conditions. It is a convenient tool that can help you capture better images without the need for external flash units. However, there are a few things you need to know to make the most out of your in-camera flash.
Firstly, it is essential to understand that the in-camera flash has its limitations. While it can provide extra light, it is not always the best option. The light from the in-camera flash can be harsh and unflattering, resulting in washed-out images. It is best to use the in-camera flash only when necessary and to experiment with different settings to achieve the desired effect.
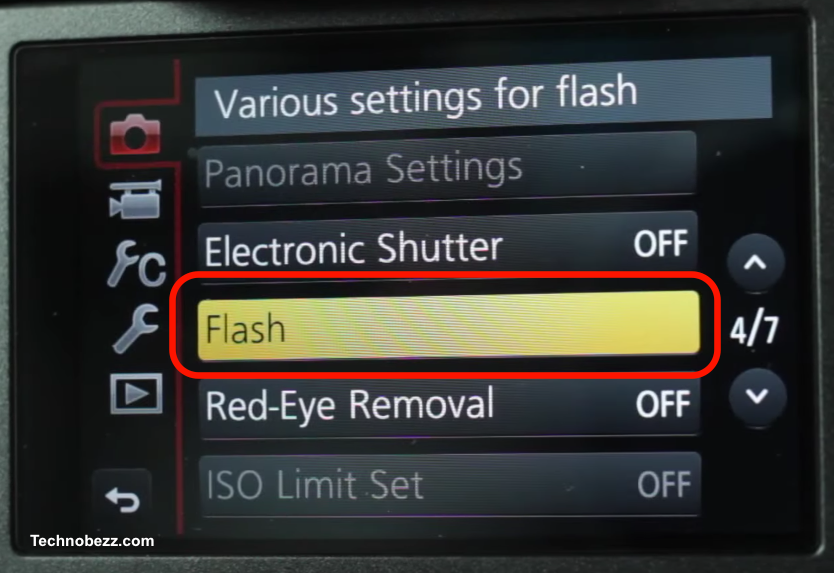
To use the in-camera flash, locate the lightning bolt symbol on your camera. This symbol indicates the flash mode. Depending on your camera model, you may have different flash modes, such as “always on,” “always off,” or “full flash.” To use the in-camera flash, select the mode that suits your needs.
When using the in-camera flash, it is essential to be aware of your camera’s settings. For example, if your camera is set to automatic mode, it will automatically activate the in-camera flash when it detects low light conditions. However, you can also manually adjust the flash settings to achieve the desired effect.


