Working with most computer software the tried-and-true copy and paste functions are fairly straightforward. NLEs make this seemingly simple action a bit more complicated.
Multiple tracks, the desire to insert and rearrange clip placement, or the need to copy and paste effects onto multiple clips are all potential issues.
You’ll need to understand the tricks of copying and pasting in Premiere if you want to do it quickly. Filmmaker Javier Mercedes has a great breakdown of some common issues and the methods you can use to accomplish certain tasks.
It even includes a quick tutorial for working with the new text-based editing functionality.
Simple Copy & Paste
The absolutely simplest way to copy and paste a clip is the same way that you would copy and paste nearly anything on your computer.
You just select the thing you want copied, hit Cmd + C, head to where you want to paste it and then hit Cmd + V.
This works in Premiere and will copy and paste to the same track as the original. If you are doing simple stuff or have a fairly empty timeline this may work very well.
If you have other footage on the same track this will overwrite what is already on the track.

Image Credit: Adobe
You can always move your footage to different tracks to make this easier. The shortcut for that is to do Option + Up. You can quickly go up and down this way.
During selection, you’ll want to hold Option so you aren’t grabbing any linked audio or video from the clip you are selecting.
Paste Insert
An alternate pasting method would be to cut some clips and then insert them elsewhere in the timeline.
You don’t want to overwrite elsewhere, you just want to cut the original and place it somewhere else between existing clips.
To do that, you’ll cut as normal, with Cmd + X, and then head to where you want to insert the clips.
You’ll press Cmd + Shift + V and it’ll insert the clips without overwriting anything. This is a fast way to rearrange a timeline without destroying your existing work.
Paste to Track Target
Sometimes you won’t want to or can’t rearrange your copied clip to make the simple pasting method work with your timeline.
For this, you’ll want to paste to a specific track. You’ll want to use track targeting.
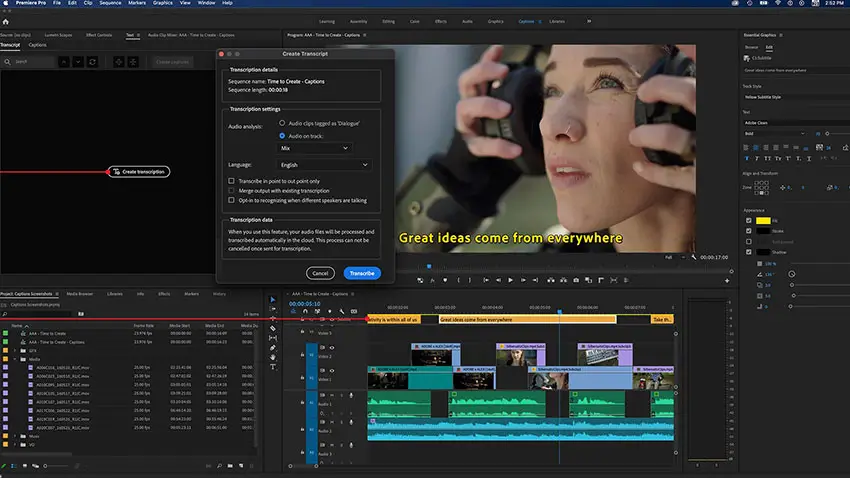
Image Credit: Adobe
You’ll need to set up some new shortcuts to make this easy. Head to your keyboard shortcuts.
When you find the paste shortcuts, you’ll see that Premiere defaults for pasting to the same track. The paste-to-target track options are blank.
To fix this, Javier actually deletes the same track shortcuts and reuses the same commands for the target track options.
These should be way more practical than same track for anyone building serious timelines.
In the example he goes and highlights the open tracks to target them and then when he pastes it is placed in the empty spots on the target track.
Keep in mind, if you have multiple tracks targeted then the pasting will be placed on the lowest track selected.
Text-Based Editing
A lot of these copy/paste methods work similarly if you are using the new text-based editing tools.
Your shortcuts will work on the timeline as you have them set up, even if you are working in the text box.
This means you’ll want to be extra careful if you haven’t tweaked your settings and just start using the text-based editing tools.
Copying Attributes
Often, you’ll want to apply the same attributes to multiple clips. If you have multiple pieces of A roll shot in the same location with the same settings, for example.
Doing all the work on one clip you can save time by pasting those changes on all the other clips.

Image Credit: Adobe
Normally, you’ll copy as usual or do right-click and then copy. Head to the clip you want to paste the attributes on and right-click it. You should see a paste attributes option.
This will bring up a dialogue box that has all the modified attributes for you to select from. This lets you tweak exactly what settings will get pasted.
To do this for multiple clips you can simply select multiple clips at a time before pasting. The faster way is to use the Cmd + Option + V keyboard shortcut to bring up the dialogue box for pasting attributes.
You can also right-click and remove attributes in a very similar way.
Copying Markers
If you have markers that you want to keep with the clips you are copying you’ll need to activate a specific setting. You’ll find it in the menu bar under Markers.
At the very bottom should be a “Copy/Paste Sequence Markers” option you can turn on. With that on you will now see the markers pasted with the clips.
Did you know that there was this much to know about copying and pasting? Anything you found particularly helpful here?
[source: Javier Mercedes]
Order Links:
Disclaimer: As an Amazon Associate partner and participant in B&H and Adorama Affiliate programmes, we earn a small comission from each purchase made through the affiliate links listed above at no additional cost to you.
Claim your copy of DAVINCI RESOLVE – SIMPLIFIED COURSE with 50% off! Get Instant Access!


