This guide will give you the easiest ways to use artboards in Photoshop.
I find Artboards really useful in my Photoshop work and I use them a lot. They can help you design graphics or strive for consistency in your work.
Let’s dive into the tutorial.
HIGHLY RECOMMENDED


Download a free copy of Adobe Photoshop to follow along with this simple tutorial.
What are Artboards?
When using Photoshop, you usually open and work with one canvas at a time.
This canvas is central to your workspace and is demonstrated by a block of color.
When using Photoshop, you can also have more than one canvas open at a time, but to view them, you need to switch from one to the other. You’re not able to view them all at once.
Artboards, in contrast, are kept on one canvas space. This means you won’t have to flip from one canvas to another to view your work.
The major advantage is that you can see all the artboards you are working on at the same time.
Although the artboards are in the same workspace, they are independent of each other. This means that when you edit the elements of one artboard, it will not affect the other artboards.
Each artboard has a folder that contains the artboard’s layers, paths, text, and design elements
When to Use Artboards
An artboard converts a single project into multiple projects, making it easy to have a bird’s eye view of all of the workspaces.
One of the main advantages of artboards is that this bird’s eye vantage point helps keep your work consistent. Consistency is important when working on certain projects.
Here are a few examples.
In graphic design: Consistency is an integral part of branding and marketing a business. All the business’s design components must look similar, from brochures, flyers, and posters to business cards.
When choosing colors: Artboards are useful when deciding on different color palettes. Placing the color choices side by side on an artboard allows you to compare them easily. This is useful when graphic designers are creating new designs or updating old ones.
For social media: An Instagram influencer might use artboards to design future posts so that they match existing posts. This keeps their account page visually appealing and coherent.
For multiple pages: Artboards are useful when creating two-sided documents, three-paged leaflets, and multi-paged brochures. Another example is photography albums. Each individual album page can be easily viewed and arranged.
The size of the canvas can be as large or small as needed to accommodate the size of your artboards. There is no limit to how large you can stretch the workspace.
At first, using artboards can be a little confusing as you will have more than one canvas – but don’t let this put you off.
The benefits of artboards are worth the effort. You will soon gravitate to using artboards instead of having numerous separate canvases open.
One tip is to use a large monitor. The more visible space you have, the easier it will be to navigate the artboard.
But don’t worry if you only have a small monitor. You can still reap the benefits of using artboards.
How to Use Artboards in Photoshop in 5 Steps
So, how do you use this great Photoshop feature? To start, let’s create the first artboard.
Step 1 – Open A Canvas
Open Photoshop, and in the top menu bar, click on File > New.
When the New Document dialogue window opens, tick the box beside “Artboards“, which is located beside the canvas orientation choices.
It’s only by ticking this box that you’ll be able to activate the Artboards features in Photoshop.

Now, select a size for your artboard by clicking on your choice of custom size.
Alternatively, enter your preferred document measurements in the right-hand panel under “Preset Details”.
For this tutorial, I will use the custom document size 1080 x 1080 px.
Click “Create” at the bottom of the New Document window, and the document will open in your canvas workspace.
This is the first artboard in the workspace.
As you can see below, the Artboard is titled Artboard 1. Artboard titles are useful, especially when you have a number of artboards, as they help you easily navigate the workspace.

An artboard folder will appear in the Layers panel, also titled Artboard 1. When you wish to access the artboard layers or add layers to an artboard, click on its folder to open it.
If you wish to rename an artboard, double-click on the name in the Layers panel and type in the new name. The name in the canvas workspace will also be updated.
As you can see below, Artboard 1 has been renamed Apple.

Step 2 – Access the Artboard Tool
To adjust the current artboard or add a new artboard, you can use the Artboard tool.
To do this, head to the toolbar and click on the Move tool to open its toolbox.
Now that the Artboard feature has been activated, the Artboard tool will appear in the Move tool’s dropdown menu.

Click on the Artboard tool to open it, or press V for the keyboard shortcut.
Once clicked, the tool’s options bar will open above the canvas workspace.
Option 1 – Edit the Artboard’s Size
The first option in the options tab is Size, the second is Width, and the third is Height.
![]()
![]()
Here, you can adjust the size of the current artboard. To do this, click on the artboard and enter the new details.
As you can see below, I have changed the size of my artboard from 1080 x 1080 px to 1000 x 1000 px.

Option 2 – Edit the Artboard’s Background Color
The next option in the Options bar is the color of the artboard’s background.
To change the color of the artboard’s background, click on the colored square icon or the dropdown menu.
When the colored square is clicked, the Color Picker dialogue box will open. Click in the box to select your choice of color, then hit OK, and the color will fill your artboard.

Alternatively, click the drop-down menu to select from White, Black, Transparent or Other..
If you select Other… the Color Picker dialogue box will open.
Option 3 – Edit the Artboard’s Orientation
The third option in the Options tab is the two orientation buttons.
When you’ve created artboards, you can change their orientation using these buttons.
The first orientation button will turn the artboard horizontally the other will adjust the artboard vertically.

Click on either button to alter the orientation of the selected artboard.
Below, we’ve switched Artboard 4 to a horizontal position simply by clicking the horizontal button.

When you change the orientation or size of an artboard, the elements inside the artboard will remain in the same position. They will not move with the artboard. Only the outer frame will move.
When you flip an artboard’s orientation, the elements within the artboard will not move.
Below is an artboard containing vector shapes.
When the artboard is resized, the frame around the elements will shift, as you can see below, but all the elements remain in the same location.

This means that the design elements will be obscured from sight, as below, when the orientation of the artboard is changed from vertical to horizontal.

Therefore, it’s best to create your artboard frames before adding design elements.
If you make a new artboard in the same position, the elements will appear in the new artboard. They will also appear in the new artboard layers.
This can be useful if you design posts that run into each other, such as Instagram posts.
Step 3 – Add Extra Artboards
Let’s get stuck into the fun part of using Photoshop’s artboards – adding new ones.
There are two ways to add a new artboard to the workspace.
The first way is to click the Add Artboard button in the Options tab, represented by a square with a plus symbol.

Once clicked, you can use your cursor to create an artboard.
Click in the empty workspace and drag your cursor. Do not click within the borders of existing artboards. Click on the black workspace around the other artboards.
When you drag the cursor over the workspace, a box will appear at the bottom left of the artboard boundaries. This box displays the current size of the artboard.
W indicates the width of the artboard, and H indicates the height.
Guiding lines will appear to guide your artboard placement. The guiding lines are helpful when you wish to line up your artboard with an existing artboard.
As you can see in the image below, the purple guiding line has appeared to help align the new artboard with the current artboard.
The value box indicates the current dimensions of the artboard.

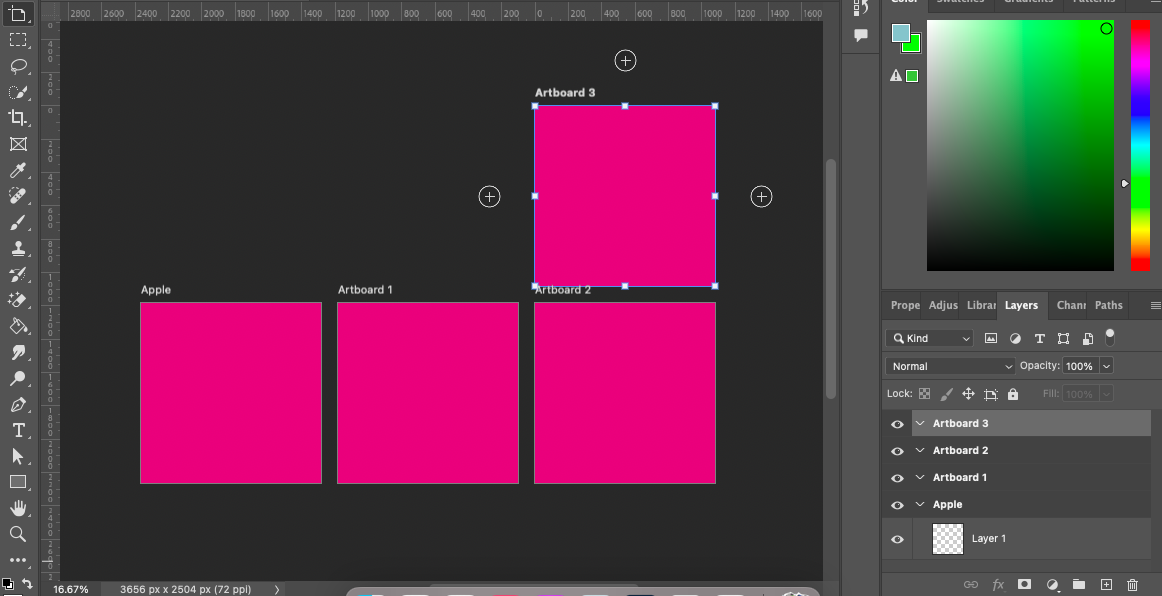
When you release the cursor, the new artboard will be created in your workspace, and a new artboard folder will appear in the Layers panel.

You can also create a new artboard by clicking on the “Duplicate Artboard” buttons that surround an existing artboard.
When an artboard is active, a circle containing a plus symbol icon will appear on each edge.

Click on the circle icon, and the artboard will be duplicated on this side.
If there are no circle icons on the edges of your active artboard, check to see if the Artboard tool is active.
The “Duplicate Artboard” button will only appear when the Artboard tool is active.
Each time you click the “Duplicate Artboard” button, a new artboard will be created on this edge. The new artboard will be an exact replicate of the previous artboard.
A new folder appears in the Layers panel whenever a new artboard is created.
If you have over five artboards, renaming them will ensure you keep organized.
For example, let’s say you use artboards to design leaflets, business cards, and brochures for a business. Renaming each artboard to coincide with the job will help you locate each artboard’s folder quickly, helping to keep a smooth workflow.

Creating new artboards using the “Duplicate Button” is good if you need to replicate artboards exactly, but not the best option if you need unique-sized artboards.
Edit an Artboard using the Properties Panel
The Properties panel is a good place to head when you wish to alter an artboard’s size or change its background color.
To edit an artboard, first activate it by clicking on it and then head to the Properties panel.
In the Properties panel, you will see the selected artboard measurements and background color.
Below, we’ll show you the two ways to change the size of an artboard using the Properties panel.
Option 1 – Change an Artboard’s Size
To change the artboard’s size, enter a new value in the box beside W (for Width) and H (for Height).
Then click Enter on your keyboard.

Option 2 – Select a Preset Artboard Size
The Properties panel allows you to select a preset artboard size. This is useful if your graphics must be restrained to a particular phone or web page size.
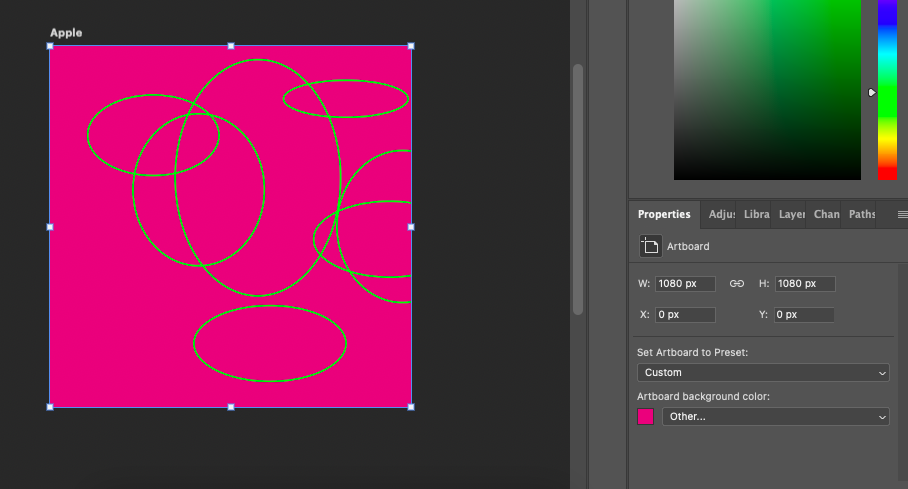
As you can see in the example below, Artboard 4’s frame is surrounded by a blue border, indicating that it’s active.
The Properties panel shows that the Artboard’s dimensions are “Custom” currently set at 558 x 138 px.

To change Artboard 4’s dimensions to a preset size, click on the downward arrow in the box below “Set Artboard to Preset.”
Once the downward arrow is clicked, the Preset options will be presented in a dropdown menu. The presets range from popular phone screen savers to the most common web page dimensions.
This means if you have to create a design specifically to suit an iPhone 13 or iPad mini, you won’t have to worry about chasing down the correct measurements. Photoshop has you covered.
Simply click your choice of preset, and the artboard’s measurements will be changed to match the needs of your project.

As you can see in the image below, Artboard 4’s dimensions have now been altered to fit the dimensions of an iPhone X.
The other artboards in the canvas workspace remain unaffected, and the workspace has been expanded to accommodate Artboard 4’s new size.

You can use this method to alter all the artboard’s dimensions.
Option 3 – Change Background Color
The last option in the Artboard’s Properties panel is changing an artboard’s background color.
Click the downward arrow in the box under “Artboard Background Color” to open a drop-down menu of background color choices.

You will be presented with a selection of choices – White, Black, Transparent, and Other…
Click on Other… and a Color Picker dialogue box will open. Click on any color in the Color Picker dialogue box to set it as your artboard’s background color.
Step 4 – How to Edit Artboards
The edits that are made to each artboard will not affect other artboards in the canvas workspace.
For example, if the canvas background color is changed on one artboard, the other artboards will not be affected.
When a new element, such as text or a vector shape, is added to one artboard, it will not be added to the other artboards.
When you wish to edit an artboard, click on it to activate it.
Now, you can edit the artboard as you would when working in a separate canvas space.
For an example, let’s add text to the artboard. Head to the toolbar and select the Text tool.
Now click on the artboard and type in the canvas workspace. As you type, you will see a new layer is added in the artboards folder.
Step 5 – How to Save Artboards
When you’ve finished working on an artboard, you can save all of the artboards or one artboard as an individual file.
Option 1 – Save an Individual Artboard
You can save an artboard individually by clicking on the artboards folder in the Layers panel to activate it.
Then head to the main menu and select File > Export > Export As.
The Export As dialogue window will open. All the artboards will be visible in the left side panel; click on the artboard you wish to save to select it.

Select the file format from the drop-down menu beside Format – either JPG, PNG or GIF – and hit Export.
A new dialogue window will open where you can specify where you wish to save the artboard.
Select a location and click Open. Your artboard will now be saved.
Option 2 – Save All Artboards
When you’ve finished working on the artboards, you may want to save them all as an entire project.
Maybe you wish to open the project again, or maybe you wish to use the artboard layout for future projects.
Head to the top menu bar and select File > Save.
Enter the name of your project and select a location, then click Save.
Your project will now be saved.
If you found this tutorial helpful, you might like to check out – 13 Photoshop Selection Tools & How to Use Them.
FAQ
How do I get artboards in Photoshop?
To open artboards in Photoshop, tick the box beside Artboards in the Open Document dialogue window.
You can set a size for the artboards in the canvas workspace by entering the dimensions in the tool’s options tab.
Alternatively, you can click and drag the mouse across the canvas to create new artboards.
What does an artboard do in Photoshop?
The artboard tool allows you to create different canvases in the same workspace.
Each artboard (or canvas space) has its own designed elements, which are separate from the other artboards.
Artboards are independently editable but can all be viewed in the same canvas workspace at the same time.
What is the use of artboards?
An artboard is useful when drafting components for a design that you wish to have a consistent look.
An artboard gives you a unique bird’s eye view of all the designs. Plus, you can easily copy and paste elements into each artboard for a smooth workflow.
How do I make more artboards?
When the Artboard tool is active, you can create more artboards in Photoshop using the Artboard tool’s options tab.
Click on the Add Artboard icon in the options tab – the square icon containing a plus symbol.
Now, click within the canvas workspace and drag the cursor across the workspace. When you have the desired artboard size, release the cursor.
The artboard will appear in the canvas workspace, and its folder will appear in the Layers panel.


