This guide will give you the easiest ways to rotate an image in Lightroom.
I’ve been using Adobe Lightroom for many years and often find that I need to rotate images.
Rotating images is necessary when an image has been taken at an uneven angle.
Let’s dive into the tutorial.
HIGHLY RECOMMENDED


Popular course reveals the simple tricks to getting incredible results with Lightroom in record time.
Give Your Photos The Look They Deserve!
How to Rotate or Flip an Image in Lightroom
There is more than one way to rotate or flip images in Lightroom. You can rotate an image using the Crop tool or flip a thumbnail by hovering your mouse above it.
So, let’s look at the different options so you have all you need to rotate images when using Lightroom.
Rotate an Image Via the Thumbnail
To rotate an image from the thumbnail, hover your cursor over the thumbnail.
Two arrows will appear at the bottom of the thumbnail, one in the right-hand corner and the other in the left.

Click the left-hand arrow to rotate the image to the right (or anti-clockwise).
Alternatively, to rotate the image to the left (or clockwise), click the righthand arrow.
Each time you click the arrow, the image will rotate 90 degrees. Thus, if you click the same arrow consecutively four times, the thumbnail will return to its starting position, completing a 360-degree turn.
If you wish to turn the image upside down using this method, click it twice.
If you have multiple images to rotate in the same direction, you can save time by rotating them together.
To do this, hold down the Command key (for Macs) or the Ctrl key (for Windows) and click on the thumbnails you wish to turn.
When the thumbnails are highlighted, they have been selected.
In the image below, three images have been selected: images 5, 6 and 7.

Click on an arrow at the bottom of one of the selected thumbnails to use the method above to rotate the images in unison.
As you can see below, images 5, 6 and 7 have been rotated, but image 8 remains unmoved.

Click an arrow again and the images will again rotate.
If you wish to undo a rotation, simply hold Command (for Macs) or Ctrl (for Windows) and press Z.
The rotation action will be deleted, and the images will be returned to their previous position.
Rotate an image in the Lightroom Menu
Another option to rotate images in Lightroom is to use the top menu bar.
Select the image or images you wish to rotate, and then head to the main menu bar and select Photo.
A drop-down menu will appear. Here you will find the options to Rotate Left (CCW) and Rotate Right. (CW).

You can also use the menu bar to flip images horizontally or vertically by selecting Flip Horizontally or Flip Vertically.
Rotate an Image using the Keyboard Shortcut
Keyboard shortcuts are favored by Lightroom fanatics and photographers alike. Why? They can save oodles of time and help you remain in the editing zone.
It may seem like a minute amount of time saved, but each click adds up when you have hundreds of photos to edit.
For rotating images, we’ll use the square brackets keys.
To use the keyboard shortcut, first select the image or images you wish to rotate.
Now you can hold the Command + ] key (for Macs) or the Ctrl + ] key (for Windows). This will rotate the image to the right (CW).
To rotate the image to the left, hold the Command + [ key (for Macs) or the Ctrl + [ key (for Windows).
To rotate the image again, simply continue to hold down the Command or Ctrl key while clicking the [ or ] key.
Each time you click the [ or ] key, the image will be rotated.
Rotate an Image using Right Click
You can also rotate an image in Lightroom by right-clicking on the thumbnail.
When you right-click on the thumbnail, a drop-down menu will appear.
The menu will present you with the option to Rotate Right (CW) or Rotate Left (CCW).

This method can also be used to rotate more than one image. Just make sure the images are selected before right-clicking.
Rotate Using the Crop tool
While rotating an image to the precise increments of 90 degrees has its place, sometimes we might want to rotate it by only a handful of degrees.
Maybe we want to align the background of one image with the background of another. So, how can we do this?
To rotate an image without restriction, use the Crop tool.
Select the photo you wish to rotate by clicking its thumbnail in the library. When it fills the canvas workspace, click Develop in the top menu bar.

Lightroom’s editing features will open in a new interface. Click the Crop tool icon.
The Crop tool is located above the tool panel on the right side of the canvas workspace.

Once clicked, the Crop tool’s options will open.
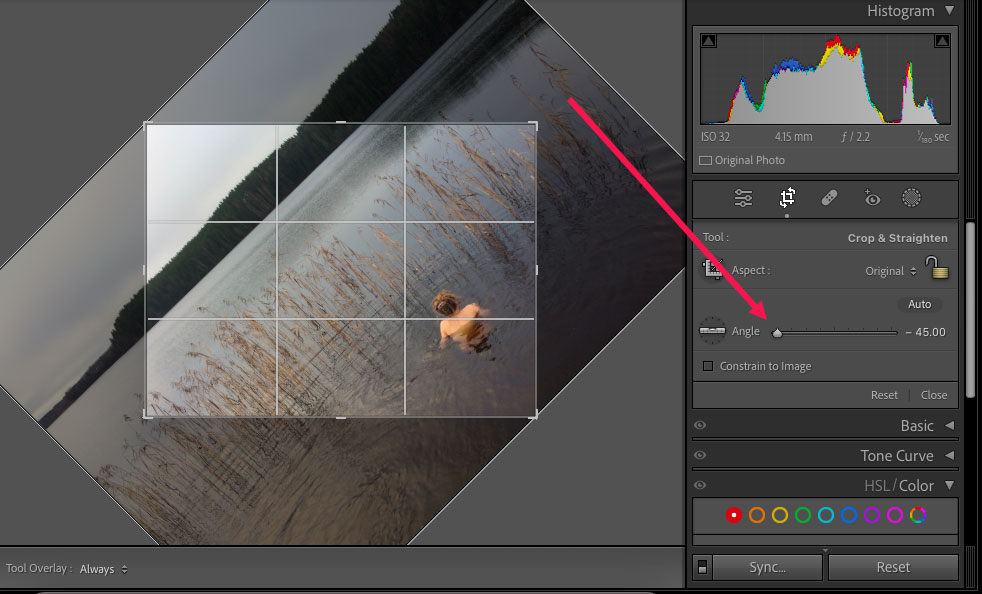
Beside Angle is a slider. Hold down on the crop slider’s pointer and move it to the left or right.
As you slide the crop slider to the left or right, the image will rotate in the canvas workspace.
Slide the crop slider to the left. The maximum degree that can be reached is minus 45 degrees.
As you can see in the image below, the photo has been rotated 45 degrees to the right.
Each time you slide, a preview will be given in the canvas workspace.
The crop tool’s borders depict where the photo’s new edges will be. The excess areas outside the border will be deleted when cropped.
Now, slide the slider to the right. The maximum degree that will be reached is 45 degrees.
As you can see in the image below, the photo has now been rotated to the opposite side.

If you have an exact angle for the rotation, you can enter it in the value box at the end of the slider.
To do this, click on the value box and enter the value, then hit Enter on the keyboard.
The image will now be rotated to the new degree.
One thing to realize when using this method is that the excess border areas will be cropped away, so beware that your image will be reduced in size.
To save the edit, click Close in the bottom right-hand side of the Crop panel.
Rotate Using the Aspect Tool
In the Crop tool’s options menu, there is an Aspect button. This can also be used to rotate an image.
Click the Aspect icon to activate it, then click and drag on the canvas workspace.

Release the cursor when you have created the size of the image border.
Now, hover the cursor over the corner edges of the border until a curved arrow line appears.
Hold down the cursor and drag the edge to rotate it.

Release the cursor when you have achieved the desired angle.
To save the edits, click Close in the bottom right-hand side of the Crop panel.
Rotate to Correct a Horizon Line
The Crop tool has another feature for rotating images: the Angle tool.
The Angle tool will level any line in an image to the horizon line.
This is very useful when you have taken photos of a sealine or horizon that is slightly off-kilter.
The Angle tool will rotate the image to make the selected horizon line level.
Click on the Angle tool to activate it.
When you move the cursor over the workspace, an eye-level icon will appear.

Click once on any section of the horizon that you wish to level, then click on another section of the horizon.
Once the second click is released, the line between the two clicks will be leveled, and the image will be rotated to accommodate the new horizon line.

To save the edit, click the Close button at the bottom of the Crop tool’s options tab.
Now you know the various ways to rotate images in Lightroom.
You might also like to check out this tutorial: How to Use Tone Curves in Lightroom.
FAQ
What is the shortcut key for rotating in Lightroom?
The shortcut key to rotate an image in Lightroom is the Command + [ key (for Macs) or the Ctrl + [ key (for Windows). This will rotate the image to the left.
To rotate the image to the right, use the Command + ] key (for Macs) or the Ctrl + ] key (for Windows).
How do you rotate an image?
To rotate an image in Lightroom, click the thumbnail of the image you wish to rotate.
Once clicked, two arrows will appear at the bottom of the thumbnail.
Click the left arrow to rotate the image to the right, and click the right arrow to rotate the image to the left.
How do I flip an object in Lightroom?
There are different methods to flip an object in Lightroom.
First, activate the object, then head to the top menu bar and select Photo.
A dropdown menu will appear with the option to flip the image vertically or horizontally. Click your preference, and the object will be flipped.
How do I change the angle of an image in Lightroom?
To change the angle of an image in Lightroom, open the image in Develop mode.
Open the Crop tool and slide the Crop tool’s slider to the left or right. This will change the angle of the image.


